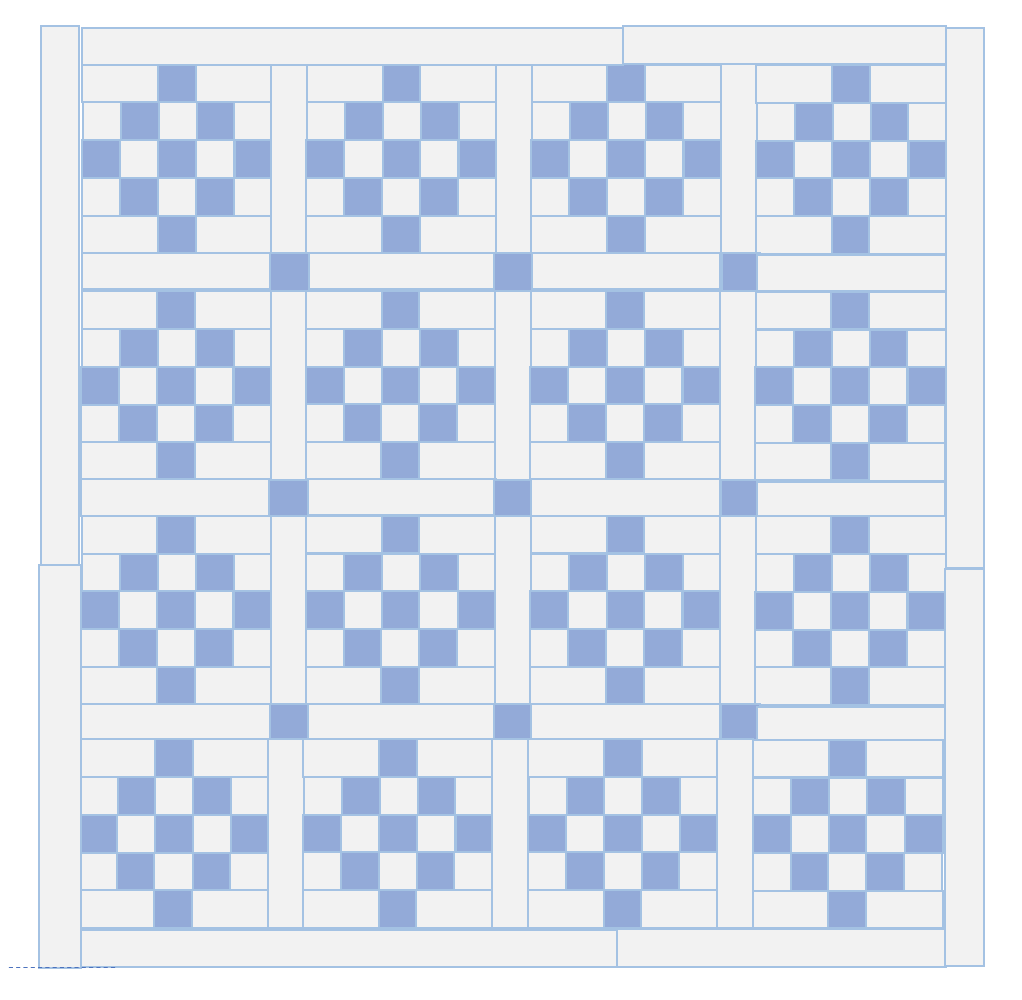
How to make: this quilt (I’m sure it’s a traditional quilt block but can’t find the name anywhere!)
Another day, another quilt made of lots of squares. But for this quilt, the squares are quite large AND we are using strip piecing so this quilt comes together pretty quickly! I made the 16 block quilt which is 75” x 75” - a lovely large throw size.
I am sure this is a traditional quilt block but despite asking on my stories and googling all sorts of terms “diamond squares block”, “block that looks sort of like a granny patch”, “two pyramids on top of each other block”, I couldn’t find anything! So here is the nameless quilt block pattern. I hope you enjoy making this and let me know if you have any questions!
Fabric Requirements:
Large Throw (75” x 75”)
Background Fabric: 4.5 yards / 4 metres (I used a cream colour- Devonstone Seeded/ this is almost an exact requirement so you may want to get a little more to be safe)
Contrasting Fabric: 1.75 yards/ 1.5 metres (I used a chambray)
Backing Fabric: 4.5 yards/ 4 metres (I used a flannelette plaid)
Binding Fabric: 0.75 yards (8-9 strips)
Cutting instructions:
From your background fabric, cut:
- (6) 6.5” x WOF
- (21) 3.5” x WOF
- (12) 3.5” x WOF subcut into (24) 3.5” x 15.5”
From your contrasting fabric, cut:
- (15) 3.5” x WOF
- (1) 3.5” x WOF subcut into (9) 3.5” x 3.5” squares
Making instructions:
Take (2) 6.5” background strips and (1) 3.5” contrasting strip and using 1/4” seams, sew together as follows. It doesn’t matter if they don’t line up perfectly on the ends as we will trim those off! Press seams towards the contrasting fabric. Repeat twice more to make three of these strip sets in total.
Then trim off the edges, and cut each strip set into (12) pieces 3.5” wide.
You will have 36 pieces in total that look like this:
Now take (3) 3.5” background strips and (2) 3.5” contrasting strips and using 1/4” seams, sew together as follows. Once again, it doesn’t matter if they don’t line up perfectly on the ends as we will trim those off! Press seams towards the contrasting fabric. Repeat twice more to make three of these strip sets in total.
Then trim off the edges, and cut each strip set into (12) pieces 3.5” wide:
You will have 36 pieces in total that look like this:
Next take (2) 3.5” background strips and (3) 3.5” contrasting strips and using 1/4” seams, sew together as follows (Don’t worry about them not lining up at the top). Press seams towards the contrasting fabric. Repeat once more to make two of these strip sets in total.
Then trim off the edges, and cut each strip set into (12) pieces 3.5” wide:
You will have a total of 24 pieces that look like this:
Now, take the following 5 pieces and sew together using 1/4” seam. You will find the seams will all nest together making them line up perfectly!
Repeat 15 more times for a total of 16 blocks. NB: You will have some leftover pieces which you can use for another project or maybe a matching cushion cover or two!
Next we will add our sashing- take (12) 3.5” x 15.5” background pieces and sew between the blocks as follows using 1/4” seam. You will form 4 rows of 4 blocks in total, with 3 sashing pieces in each row.
Then we will add our horizontal sashing- take (4) 3.5” x 15.5” background pieces and attach to (3) 3.5” x 3.5” contrasting pieces as follows:
Now sew all the rows together.
Finally we will sew on our borders. Take (2) 3.5” x WOF pieces of background fabric and sew together, short ends together (make sure to cut off the selvage first).
Using 1/4” seam sew to the top half of your quilt. Trim excess off. Repeat for the other three sides as follows.
And your quilt top is done! Baste, quilt and bind as desired.
Basting with QC Duffy :-)
A note on fabric and wastage: I try to make my tutorials have as little waste as possible however balance this with making the tutorials as straightforward and beginner friendly as possible! With these instructions, for the sashing and border, with more seams and using some of the smaller leftover pieces, you could get away with a few less strips - if you are an experienced quilter, you can try cutting (3-4) LESS 3.5” x WOF background strips and sew the smaller pieces together.
Now onto the actual quilt!
I made my version using a chambray colour as my contrasting colour and Devonstone Seeded for the background colour. I used the same chambray colour for the binding and a lovely soft plaid flannelette for the backing!
I made this quilt for my sister in law, Melanie who lives in London but who I was meeting in Taipei- of course I only started making it on the Sunday before I was leaving on the Wednesday- and of course I decided it HAD to be hand quilted! (spoiler alert, I got it done but spent some time on the plane finishing it off).
I would have loved to take some more photos but the lighting in our hotel room wasn’t great and it was super windy for the quilts in the wild shot (41 stories up on the top of the Shangri La hotel!)
I hope you found this tutorial useful and as always, please let me know if you have any questions :-)


